storage for my paper projects...come take a look!
Showing posts with label kit. Show all posts

09 July 2012

one line, two ways - part two

Hello again!
Today I have more layouts from my June kit from Scrappy Chic -- and once again, I made two rather different layouts with just one line of paper. This time around, it's KaiserCraft's Check In, which is ostensibly a travel line, though calling these "travel" pages would be a stretch, for sure!

First up, a page about one of my husband's choirs - 


How considerate of them to match my papers so well with their red and black performance outfits. ;) This color scheme pretty much wrote itself, and I used one of my favorite go-to layouts: trim the patterned paper to size, cut it into two pieces, and flip one of them. Done. The embellishments keep it looking fresh -- here I used some of the perforated elements from the line, plus a border punch, some ribbon, and black alphas that almost match the patterned paper.


I also turned to Jenni Bowlin (queen of red and black) and grabbed some gems and butterfly stickers from my J.B. stash, along with a new stamp set from Maya Rd to house a bit more patterned paper. Andrew actually liked this one so much he took it into school to show the kids in the choir -- isn't that sweet?

For my second page, I went in a different direction, color-wise:

This actually looks busier in the photo than it does in real life, I swear -- but here, I scrapped Andrew's childhood love for an antique traffic signal. Yep. The big, awesome historical museum near us recently redid their whole transportation exhibit (and in Detroit, transportation exhibits are kind of a big deal), and Andrew was worried that his traffic light wouldn't be part of the refurbish...but it was. Happy boy. So this time around, I used the road and ticket images from the line to fit the nature of the museum's exhibit rather than a real road trip.


Those tickets come from the line, and I added some more Jenni Bowlin stickers (since they were on my desk), plus some punched circles from one of my favorite Hambly transparencies (RIP :( - I'll miss them).

Well, that's enough words from me for one day, don't you think? You can see these projects and get your hands on the products I used at Scrappy Chic -- as always!

{Ok, one more thing: I'm fortunate enough to be headed off to CHA for a second time! We'll be heading out early for some pre-show events, and then I'll be right in the thick of things once again -- I can't wait! So, I'll likely be posting some quick and photo-heavy posts while I'm there...if there are any lines, projects, or people you'd like to see more or less up-close, be sure to let me know! In the meantime, you can access a great list of all the sneak peeks here -- they're starting to come in pretty heavily this week!}

Have a great Monday!

05 July 2012

one line, two ways - part one

Well, hello there! Pardon my brief absence -- we went to Chicago for a few days (nice little mini vacation -- mini album to follow ;) ), and then came back just in time to spend the 4th with family and fireworks. Happy Independence Day (a bit late), and Happy Canada Day, too (a bit later!).

In my June kit from Scrappy Chic, it just so happened that I had papers from We R Memory Keeper's monthly line, Red White and Blue. Needless to say, they were very patriotic papers, with a bit of a military theme. Unfortunately, I was scrapping with them sans any photos that fit either theme! What's a girl to do? 

First, I selected a photo that I wanted to scrap and that fit well with the colors -- one of my parents' dog, Roxy. Then, I searched my stash for a bit of inspiration to both tie the colors of the line together AND pull away a bit from the patriotic-ness. Here's what I found:


Yup, just one sticker (this one's from American Craft's Chap line) -- but it has blues, red, AND a golden yellow -- ta da! Suddenly, instead of a patriotic color scheme, I had a primary color scheme with a twist. Here's the layout in full:


Now it's a festive layout about a cute dog that just happens to include some stars. Nice! I made sure to repeat the yellow enough to make it look intentional -- the inspiration sticker, the title (basic grey and october afternoon alphas), the label sticker up top, and in this embellishment cluster:


I added pins from Maya Road, a paper clip flag from Smash, and more stars in sticker and veneer form (the veneers are Studio Calico, and they're sprayed with yellowish Mister Hueys).  I call it a success!!

But after all, it is a patriotic line, so I made a bit of patriotic decor as well:


I used star tins from Maya Rd along with die-cut stars, circles, and scalloped circles to pull this one together (I used my beloved new Silhouette for the die-cutting, but simple shapes like these are available for any system). 


The tins (which are about 2.5" across, if you'd like a sense of scale) are painted with Ranger Distress Paint first, then the stars are added, then the tins got a layer of crackle medium (mine was Ranger also, but other brands exist). The little alphas are LilyBee (kit leftovers from the other week), and the large alphas are old Thickers.


You can really see the crackle effect here. Twine from Maya Rd. and Divine Twine tie it all together...literally. You can find both projects at Scrappy Chic, as well as on their blog today. You'll find me at the store today as well -- it's Freedom Grab day! Get your shopping on, local folks!

Enjoy your day, and see you soon.


25 June 2012

kit leftovers, one more layout, and giu winner!

 Happy Monday, everyone! Since I spent all last week using one self-made Counterfeit Kit to make all my Growing in Unity projects, I thought I'd show you what's left. Whenever I make myself kits (Counterfeit or otherwise), I try to start with a color scheme in mind. This time, it started with the crazy bird paper from Basic Grey in the middle of the photo below. While that gave me a range of colors, I stuck primarily with turquoise and yellow, with a few neutrals and such. I only added two sheets of cardstock, but grabbed a few more for backgrounds and cards as needed.


I used cardstock from Bazzill and SU, solid-color paper from Basic Grey Urban Prairie (white, turquoise, yellow), geometric prints from Echo Park Style Essentials (probably the only line still being sold at full price), and patterned paper from Studio Calico Homefront, Basic Grey Lime Rickey, and Melody Ross for GCD.

I didn't follow the original kit list for embellishments precisely, but I did try to limit myself and use fairly old products. Besides what you see below, I also added a few other bits here and there -- ribbon, brads, mist, glitter, etc. Of course, I used a lot of stamps, but you can see more about those in last week's posts.


I used Fabrips, die-cut tags, rub-ons and letter stickers from Studio Calico, stickers, rub-ons, and Thickers from American Crafts, and letter stickers from LilyBee (the newest of all the embellishments).

While I had all my leftovers just sitting there, I felt inspired -- so I grabbed all the small scraps and a couple of the larger ones and threw together a quick layout -- I only trimmed papers if they were longer than my 8.5x11 page, otherwise they just got layered rather willy-nilly along with a few more embellishments. Here's the result:


I've been doing "twelve {photos} on 12{th of the month}" layouts all year -- this is June's. A rather eventful food day, really -- I made both homemade sauerkraut and strawberry jam...picked lavender for drying...and shucked peas to make risotto while I was at it.  How Little House on the Prairie of me (well, maybe not the risotto part, but definitely the pea shucking!). Yum.


A closer shot of the photos (all from instagram -- you can also see my feed over in the sidebar now, by the way) and the journalling if you're inclined to take a gander. Added bonus: my leftover pile is even smaller now! I just might kill the whole thing instead of re-filing it.

Ok, I know some of you are probably here for the big winner. How very patient of you! (Unless you just scrolled to the bottom...but you don't have to tell me that!). Well, without further ado, here's what random.org gave me:


Commenter #37 is Miriam Prantner! Congrats, Miriam -- I'll send your info along to the lovely folks at Unity.

I'll do my best to make my way around all your blogs this week, and I hope you'll return to see what I have for you later this week -- some of my June projects for Scrappy Chic. Until then, enjoy!

08 March 2012

Yep, another sketch!

Hey there, y'all!

There's a new sketch challenge blog out there called Retro Sketches, brought to you by some of the same talented ladies from the ColourQ challenge blog. They're cardmakers, but I was inspired to use their first sketch in a slightly different way....


...It's probably no surprise that this magically turned into a layout :). I've really been on a scrapping kick lately! So, here you go:


Aside from the change in scale, the only real way I changed the sketch is by replacing the focal point with a series of three little photos (in this case, photos of Simon snacking on some cinnamon roll crumbs -- sneaky cat!). Technically, there's also one additional layer:


...tulle! It's a little easier to see here, but feel free to enlarge the photo. The tulle adds really subtle texture, and I have to remember to use it more often! This is another layout using my first Studio Calico kit, along with a few bits and bobs from the ol' stash.

You have until the end of the day to play along with this challenge -- it really does make for some cute cards, too, as you can see over on the Retro Sketches blog. Have fun!

05 March 2012

A Sunday sketch (on Monday)

Happy Monday!
A quick post for today -- in a bit, I'm heading to Ohio to visit a friend for the day. Hooray for Spring Break! But for now, I've got a layout I made just yesterday up at Scrappy Chic. (Please pardon the nighttime photos.) I used the Sunday sketch from Studio Calico (and feel free to check out their post -- the sample layout from Kelly Purkey is so fun!):


This also marks one of the first layouts I've made with my new Studio Calico kit subscription -- last month's kit (Daydream Believer - oddly timely title!) was my first one, and I dig it. Here's my take:


Yeah, that's me (pretending to) smooch a portrait of a very serious-looking dude. I think the title explains most of what you need to know. Andrew snapped this one after the Collage Concert at the University of Michigan, which means we were surrounded by both college kids and older folks in furs and stuff. Silly, indeed.


I had some kit and stash items I wanted to use, so I embellished the sketch a bit. Here, you can see some fabric trim from the kit, which I misted in aqua and then stamped. The epoxy circles are from the kit, but the little badge is ancient American Crafts.


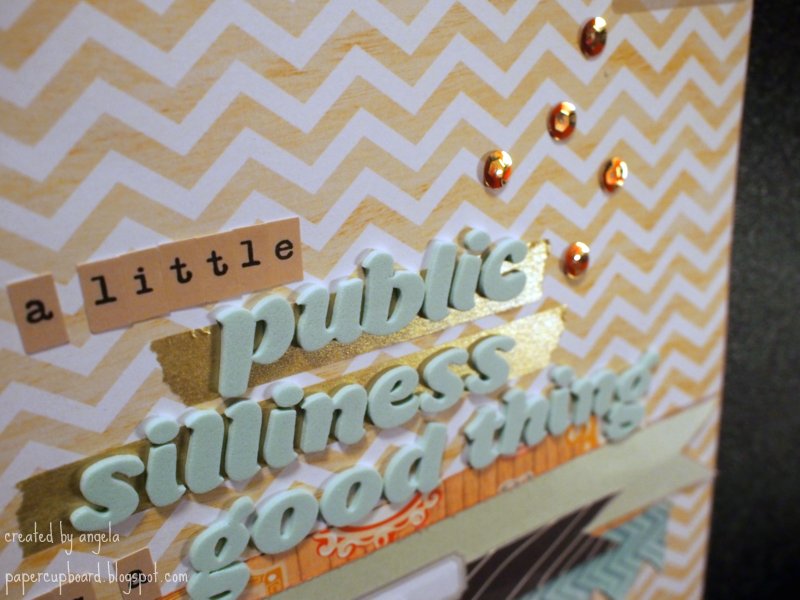
I'm happy to see that sequins are trendy right now, especially since I already own some. I used gold sequins to accent the gold washi tape under my title (I think the gold tones down the minty-ness of the alphas somehow...which is good for me since mint is good on this layout but isn't normally a color I like very much). Both alphas and  the minty twine are from Scrappy Chic, and everything I haven't mentioned yet is from the kit (including that awesome woodgrain chevron paper, which is from the latest Dear Lizzy collection...I might need to stockpile a few sheets of that one!).

Anywho, I gotta pack a bag and get a few things in order, so I'll leave it at that. Hope you have a lovely day!

19 October 2011

SiSiS: Stuff I Scrapped in September, part one.

Hey folks -- I'm back!

So far in October, I've done very little scrapping -- and I have a bunch of it to do before month's end, so I guess I'd better get on that. However, September was pretty productive for me, so I thought I'd share a few batches of those layouts with you.

You can see some of my scrap-related projects from September in this post, and in this one. Here are some layouts you haven't seen yet:

First up, a bright and cheery layout about the little sort-of surprise party we had for my aunt's 59-and-a-half-th birthday (like that? Thought so.) I used some Basic Grey goodies here -- the fun Indie Bloom line, specifically. I fussy-cut (yes! me!) a big ol' flower and some leaves to frame my cluster of little photos, and used another subtler pattern to anchor the cluster and my title. Six photos is a lot for an 8.5x11 scrapper, but I was up for the challenge. Also, we did not make her wear that silly hat and vest all day -- just long enough to get some photos! Next:

These photos are from the exact same party, just later in the day. My uncles decided to fire off this tiny antique cannon that had been used primarily as a yard ornament -- and it worked. And it was LOUD! Who knew? It's a little hard to see in the photo, but the whole thing is not even two feet long! The title is true -- my uncles are seriously easygoing guys and mild-mannered in the extreme. I guess gunpowder just riles them up, eh? Ah, men. Anyway, I used Crate Paper's Farmhouse line here -- the ruler print is two sheets from the 6x6 pad lined up together, while the quilty squares are un-fussily-cut from a 12x12 sheet. The letters started white, but I inked 'em. Fabric-covered letters are handy for that! Oh, and those asterisks are from Studio Calico -- they started as plain wood veneer, but I hit them with some Distress Stain (thanks for the tip, Liz).

Pretty much everything here is available at Scrappy Chic, so shop (locally) away!

I'll be back soon with either a couple of pages featuring the hubster, or a few featuring little me. Which would you like to see next?

Have a blustery grey wet lovely day!

09 June 2011

Counterfeit Kit(ten) Challenge: June

Hi folks!

After taking a couple of (otherwise busy) months off, I decided to join in for the Counterfeit Kit Challenge for June. They chose a fun kit from a new kit club called Burlap and Buttercups (click the link to see the original kit). I love the spring/summer colors in the challenge kit:


In addition to stuff from my stash, I also wanted to include some goodies from my design team kit from Scrappy Chic -- nothing wrong with a twofer! Here's what I came up with:


New goodies from Sassafras's latest collection, Sunshine Broadcast (part of my DT kit), some of the new Pow! glitter paper from American Crafts (which has a lovely, mess-free texture AND works in electronic die-cutting machines, not that I have one....), and a bunch of other goodies I've been itching to use.

Just what will I be scrapping, you ask? I'll give you one guess....


I'll have a bunch more posts coming up -- I've unintentionally stockpiled a whole bunch of projects (and by "unintentionally," of course I mean "I've been a lazy blogger.").

08 March 2011

It's Counterfeit Time!

Time for a new Counterfeit Kit Challenge, that is! I was so super-excited to see that this month's challenge is to counterfeit Studio Calico's latest release! I just love their stuff anyway, and I have purchased a couple kits in the past, so it was extra-fun to save some dough and counterfeit one instead!

Here's the actual main kit, Into the Woods (which sold out in, oh five hours or so...):


And here's my take:


I had plenty of papers to choose from for reasonable facsimilies, including some older Studio Calico stuff I already had. I also broke out an older Papertrey Ink stamp set to replace the cute bee stamp in the kit.

I could have stopped there, but I decided to replicate some add-on kits as well....Here's Babbling Brook


And here's my version:

Admittedly, I lucked out here: I actually won a Social Club crafting kit from Cosmo Cricket, so I have some of the actual papers from the add-on (haven't seen them in stores yet). They're the top-right and bottom-left choices.

There are three other add-ons available (or formerly available) from Studio Calico -- I won't show all three photos, but I took bits and pieces from each and came up with one more of my own:

Gives me a chance to use some of my new Stella & Rose goodies (the original kits use the 12x12, but I have the 6x6 instead), as well as a combo of newer and older goodies from the stash.

Will I use it all up? Probably not. But I gotta say, I'm really inspired to make stuff with these kits! In fact, I already made one project! Here:


Yes, those are photos of our cat with a Justin Bieber hairdo. No, we did not invest in a cat wig ;) It's part of Jimmy Fallon's iPhone app (LNJF) called "Bieber Yourself." How could we resist? Most of the goodies on this layout came from my main kit, with a few elements from the add-on. And yes, I used my bee stamps. Bieber=bee-ber. I crack myself up.

Anyway, happy counterfeiting to you all! I'll be back in the studio today...who knows what's next?

Oh, and be sure to stop by again tomorrow -- I'll be celebrating a blog birthday, and there just might be a little giveaway!

Have a delightful day!

08 February 2011

My Counterfeit Kit -- and a blast from the past!

Hi folks -
There's a pretty new challenge blog called Counterfeit Kit Challenge, and it is perfect for those of us with a love of pretty scrap kits but no real need for even MORE new product than what's already in our ever-growing stash.
See, every month, the folks at the blog will choose a current club kit, and then we can go shopping...in our stash! The goal is to replicate the kit with what we already own! So smart. Then, all month long, there are little challenges to give that newly-counterfeited kit a purposeful existence. Last month, there were some awesome tutorials for making all kinds of embellishments. Anyway, go check it out!

This month's challenge kit is actually a true challenge for me: it's from Scraps of Darkness, and you can see a bunch of photos via the links in this post, but I'll just give you the main kit here:


 Lots of black and red and damask and florals and such. Definitely a love theme, but not a mushy one! If it's any help, the title of the kit is "The Telltale Heart." Of course, that Poe story is about a man who stalks and kills his neighbor and then goes (more) mad almost immediately, but I'll try not to scrap any of that! :)

Well, I shopped my stash and made my own version. Here you go:


My version of the main kit.


My version of the add-ons. I think I'll need to make a few embellishments to round things out, but I'm ready to try whatever challenges come along!

So, while I was going through some older supplies both for the kit and to purge/sell in the upcoming Scrapbook Yard Sale at Scrappy Chic (it's Sunday, 2/20 -- you should totally go!), I found one of my earliest stamping efforts. I believe I was testing out my new white inkpad (I bet it's the Memories white dye ink -- which I still have, thank you very much), and learning how to second-generation stamp. Wanna see it? Ok, for you, I'll embarrass myself a little:


This would be from late 2002 or early 2003 -- near the middle is the custom stamp I had made for our wedding invitations, and many of the other images are from my first couple of stamp purchases. It's a full 8.5x11" sheet of (very cheap) black cardstock. It makes me feel very sentimental, and very glad that I stuck with it! What's your earliest stamping project? I'd love to see it!